
Tying a Uni Knot: A Comprehensive Guide
Have you ever wondered how to tie a uni knot? This versatile knot is a staple in the world of fishing, but its practical applications extend far beyond the water. Whether you’re a beginner or an experienced knot tyer, understanding the nuances of the uni knot can enhance your skills and make you more confident in various situations. In this article, we’ll delve into the details of tying a uni knot, exploring its history, benefits, and step-by-step instructions.
History of the Uni Knot

The uni knot, also known as the uni loop or uni surgeon’s knot, has a rich history that dates back to the early 20th century. It was developed by the Japanese fishing company, Seaguar, and quickly gained popularity among anglers worldwide. The uni knot is known for its strength, simplicity, and ability to withstand heavy loads, making it an excellent choice for a wide range of fishing applications.
Benefits of the Uni Knot
There are several reasons why the uni knot is a favorite among anglers and outdoor enthusiasts:
| Benefit | Description |
|---|---|
| Strength | The uni knot is known for its exceptional strength, making it suitable for heavy-duty fishing applications. |
| Reliability | This knot is highly reliable, even when subjected to harsh conditions and heavy loads. |
| Easy to Tie | The uni knot is relatively simple to tie, making it accessible to beginners and experienced knot tyers alike. |
| Adaptable | The uni knot can be used in various fishing scenarios, from freshwater to saltwater, and for a wide range of fish species. |
These benefits make the uni knot a versatile and practical choice for anyone looking to improve their fishing or outdoor skills.
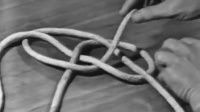
Step-by-Step Instructions for Tying a Uni Knot
Now that you understand the history and benefits of the uni knot, let’s dive into the step-by-step instructions for tying it:
-
Start with a long, straight piece of fishing line. The length of the line will depend on the size of the knot and the application.
-
Take the end of the line and make a loop, passing it through the eye of the hook or swivel.
-
Pass the end of the line through the loop you just created, forming a second loop.
-
Take the end of the line and pass it through the first loop, creating a third loop.
-
Pass the end of the line through the second loop, creating a fourth loop.
-
Now, take the end of the line and pass it through the first loop, creating a fifth loop.
-
Pass the end of the line through the fourth loop, creating a sixth loop.
-
Finally, pull the end of the line to tighten the knot, ensuring that all loops are snug and secure.
Once you’ve completed these steps, you should have a well-tied uni knot. Remember to practice the steps a few times to become more comfortable with the process.
Common Mistakes to Avoid
While the uni knot is relatively straightforward, there are a few common mistakes that can affect its performance:
-
Not passing the end of the line through the loop enough times can result in a weaker knot.
-
Not tightening the knot properly can lead to slippage or failure under stress.
-
Using a line that is too thin or too thick for the uni knot can also impact its strength and reliability.
By being aware of these mistakes and taking the time to practice, you can improve your uni knot-tying skills and ensure that your knots are as strong and reliable as possible.
Conclusion
Tying a uni knot is a valuable skill that can benefit anglers and outdoor enthusiasts alike. By understanding the history, benefits