
Unlocking the World Wide Web: A Detailed Guide to Using uni kassel vpn on Mac
Are you a student or faculty member at the University of Kassel looking to access restricted resources or simply enhance your online experience? If so, you might be interested in setting up the uni kassel vpn on your Mac. In this comprehensive guide, we’ll delve into the intricacies of installing, configuring, and using the uni kassel vpn on your Mac, ensuring you have a seamless and secure connection to the university’s network.
Understanding uni kassel vpn

Before diving into the setup process, it’s essential to understand what the uni kassel vpn is and how it works. The uni kassel vpn, or virtual private network, is a secure and encrypted connection that allows you to access the university’s network from anywhere in the world. By using the vpn, you can access restricted resources, browse the web anonymously, and protect your data from potential cyber threats.
The uni kassel vpn is provided by the university to ensure that all students and faculty members can access the necessary resources for their studies and work. It’s important to note that the vpn is only available to authorized users, and you must have a valid university account to use it.
System Requirements
Before you begin setting up the uni kassel vpn on your Mac, ensure that your system meets the following requirements:
| Minimum System Requirements | Description |
|---|---|
| MacOS Version | macOS 10.13 or later |
| Processor | Intel Core i5 or later |
| RAM | 4GB or more |
| Storage | 100MB of free space |
Installing the uni kassel vpn on Mac
Now that you know the system requirements, let’s move on to installing the uni kassel vpn on your Mac. Follow these steps to get started:
- Open the Safari browser on your Mac.
- Go to the uni kassel vpn download page (https://www.uni-kassel.de/de/studium/studienangebot/it-infrastruktur/vpn.html).
- Click on the “VPN Client” link to download the installer package.
- Open the downloaded package and follow the on-screen instructions to install the uni kassel vpn.
- Once the installation is complete, you can launch the uni kassel vpn application from your Applications folder.
Configuring the uni kassel vpn
After installing the uni kassel vpn, you’ll need to configure it to connect to the university’s network. Follow these steps to configure the vpn:
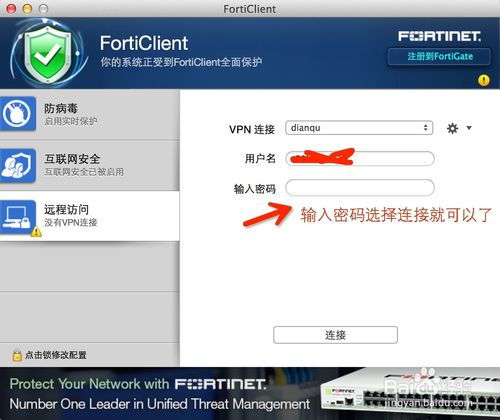
- Open the uni kassel vpn application on your Mac.
- Click on the “Create VPN Configuration” button.
- Enter your university username and password when prompted.
- Select the “uni kassel” server from the dropdown list.
- Choose the “L2TP/IPsec” protocol from the dropdown list.
- Click on the “Create” button to save the configuration.
- Select the newly created configuration from the dropdown list and click on the “Connect” button.
Connecting to the uni kassel vpn
Once you’ve configured the uni kassel vpn, you can connect to the university’s network by following these steps:
- Open the uni kassel vpn application on your Mac.
- Select the configuration you created earlier from the dropdown list.
- Click on the “Connect” button.
- Enter your university username and password when prompted.
- Wait for the vpn to establish a connection. You’ll know the connection is successful when the vpn icon in your menu bar turns green.
Using the uni kassel vpn
Now that you’re connected to the uni kassel vpn, you can access the university’s network and its resources. Here are a few tips to help you make the